September 7, 2026
Fix 3 Change Order Causes on Multifamily Outdoor Locker Foundations
A construction checklist for multifamily teams. Concrete pad and anchor specs, power and network rough ins, plus climate adaptations to prevent costly...
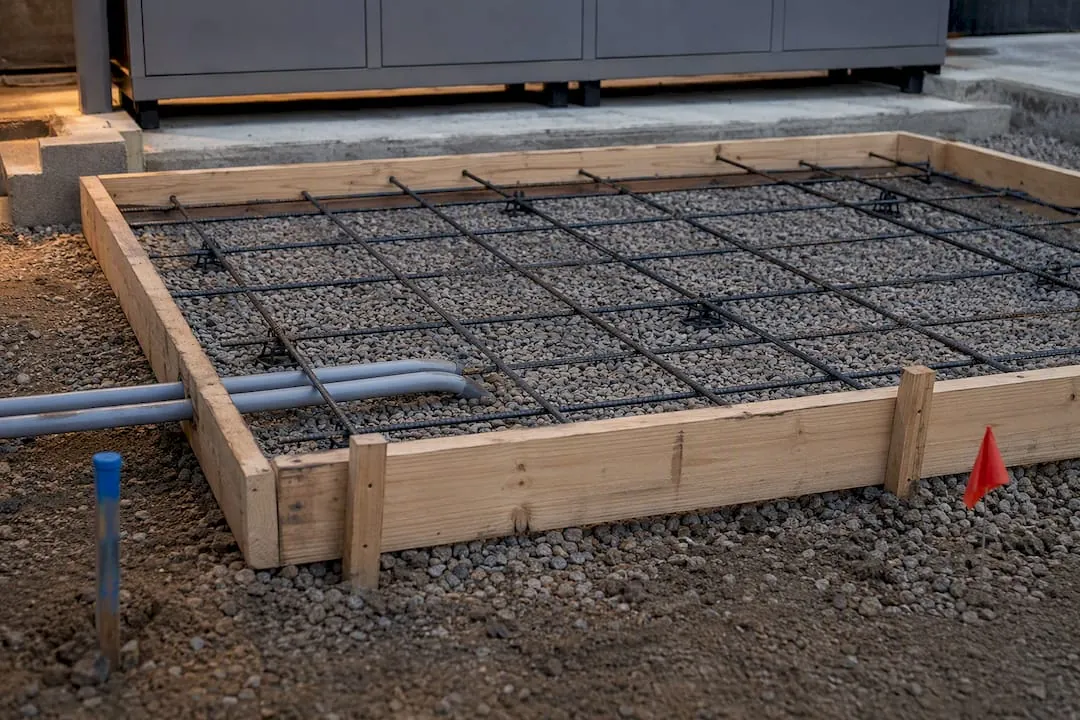
Install outdoor package lockers on a reinforced concrete pad sized to the pedestal’s footprint, with anchor bolts set to the vendor’s exact template, embedded on compacted gravel below local frost depth. Add positive drainage, a dedicated power and data rough-in, and climate-matched hardware, and you eliminate the most common causes of installation delays and warranty disputes. Get the pad and rough-ins right before the crew shows up, and the locker install itself takes a fraction of the time.
TL;DR:
- Ensuring foundation depth extends below the local frost line is critical to prevent slab heave and cracking caused by seasonal freeze-thaw cycles.
- Precise anchor bolt specifications, including diameter, embedment depth, and pattern, must match manufacturer templates to avoid costly on-site modifications.
- Electrical and network rough-ins should be planned before pouring the pad, with conduit stub-ups and surge protection installed to prevent delays.
- Soil conditions such as expansive clay or high water tables require geotechnical review and possibly engineered solutions to guarantee a stable, durable pad.
- Climate-specific adjustments, like frost-resistant hardware or higher corrosion protection, are essential for long-term reliability in extreme environments.
Table of Contents
- Quick Site-Readiness Checklist Before You Pour
- How Do Soil and Frost Depth Affect Foundation Design?
- What Are the Concrete Pad and Anchor Specs Contractors Need?
- Power, Data, and Connectivity Rough-In Planning
- Step-By-Step Anchoring and Pedestal Installation Checklist
- Adjusting Materials and Anchors for Local Climate
- What Should Be Checked at Commissioning and Ongoing Maintenance?
- Our Perspective: What Field Experience Actually Teaches
- How We Support Your Locker Foundation and Installation
- Sources
Quick Site-Readiness Checklist Before You Pour
Most locker installation delays trace back to decisions made weeks before anyone breaks ground. Run through this list with your construction team and vendor before finalizing drawings:
- Match capacity to volume. Confirm expected delivery throughput and reserve enough footprint for the compartment mix, not just a unit count, since sizing by delivery volume performs more reliably than sizing by door count alone.
- Lock in the pad location. Record clearance from drive lanes, combustible items, and required ADA-accessible paths to the unit.
- Verify power and connectivity. Identify the disconnect location and decide between hardwired network or cellular before conduit goes in the ground.
- Check grading and permits. Confirm subgrade compaction, drainage slope, and whether your jurisdiction requires a building permit for the pad.
Skipping any one of these tends to surface later as a change order, usually the expensive kind that stalls a punch list.
How Do Soil and Frost Depth Affect Foundation Design?
Foundation depth is a local code question before it’s a locker question. A pad poured too shallow in a freeze climate will heave with the frost line, cracking the slab and loosening anchors within a season or two.
- Pull your local frost depth from the building department or a geotechnical reference, then confirm whether the foundation needs to extend below it or whether a thickened, well-drained pad is acceptable in your jurisdiction.
- Compact a crushed stone sub-base beneath the pour. Manufacturer guidance consistently notes that pads set on compacted gravel or crushed stone perform better through freeze/thaw cycles than pads poured directly on native soil.
- Grade away from the pedestal on all sides, and chamfer or slope the slab edge in landscaped areas so storm runoff sheds instead of pooling at the cabinet base.
- Confirm permit requirements early. A concrete pad and electrical rough-in often trigger a building or electrical permit, and outdoor locker installs increasingly get treated like Division 10 mailroom submittals during plan review.
- Bring in a geotechnical or civil engineer when soil is expansive clay, fill, or has a documented high water table. A standard pad detail assumes reasonably stable, load-bearing soil, and that assumption doesn’t hold everywhere.
Get this stage wrong and you’re not fixing a locker problem. You’re fixing a slab problem with a locker sitting on top of it.
What Are the Concrete Pad and Anchor Specs Contractors Need?
Construction drawings should specify dimensions, mix, reinforcement, and anchor details rather than leaving them to field judgment. Manufacturer manuals give contractors a solid starting template, and deviating from it without engineering sign-off is where most anchor failures originate.
Concrete strength callout: Vendor installation manuals commonly call for a minimum 48-inch square pad per pedestal, roughly 8 inches deep on compacted gravel, poured at approximately 3000 psi compressive strength. In freeze climates, manuals also recommend air entrainment, typically in the 4 to 6 percent range, to resist freeze/thaw spalling.
Key specification points to lock into your drawings:
- Pad thickness: 8 inches is standard for single-pedestal installs; multi-bank kiosks or heavier refrigerated units may call for thicker pads or piered footings.
- Mix and slump: Confirm slump range with your ready-mix supplier and specify air entrainment for any climate with regular freeze cycles.
- Reinforcement: Wire mesh handles most standard installs; rebar or fiber reinforcement is worth specifying for larger pads or unstable subgrade.
- Anchor bolts: Diameter, embedment depth, protrusion length, and bolt pattern must match the pedestal template exactly, including torque specs for the nuts once the cabinet is set.
- Reusing existing pads: Check for cracking, spalling, exposed rebar, and confirm anchor embedment and thread condition before reusing an old slab for a new unit.
Don’t let a contractor eyeball an anchor pattern. A half-inch mismatch on bolt spacing means drilling into cured concrete on installation day, which nobody wants.
Power, Data, and Connectivity Rough-In Planning
Electrical and low-voltage rough-in decisions made during design directly affect how smoothly the unit commissions on install day. Get the conduit and conductor sizing wrong, and you’re trenching again after the pad is already poured.
- Dedicated circuit: Run a dedicated circuit to a labeled disconnect near the pedestal; confirm exact breaker sizing with the vendor rather than guessing from a similar project.
- Network choice: Hardwired Ethernet with PoE or PoE+ delivers more stable uptime for cameras and touchscreens, but cellular modems are worth considering where trenching to a network closet isn’t practical.
- Conduit routing: Stub conduit up inside the pedestal footprint before the pour, and bury feeder conduit at a depth that matches local code, typically well below the frost line and any planned landscape work.
- Surge protection: Add surge protection at the panel, and consider a small UPS for control electronics so a brief outage doesn’t force a full reboot cycle.
- Vendor coordination: Schedule a commissioning call with the locker vendor’s technical team before the unit goes live to confirm network handshake and remote monitoring access.
Pro Tip: Order your conduit and junction box stub-ups before the concrete crew arrives, not after. Adding a sleeve to cured concrete is a core-drilling job, and that’s a call you make once and never want to repeat.
Step-By-Step Anchoring and Pedestal Installation Checklist
Once the pad has cured, anchoring the pedestal is where manufacturer instructions matter most. Field crews that skip a step here usually catch it during the first heavy-load week, when a loose bolt finally shows up as a wobble.
- Use the manufacturer’s pedestal template to mark anchor locations precisely, then drill or set anchor sleeves to the specified depth and pattern.
- Place a rubber isolation pad if the manual calls for one, shim the pedestal until it’s level, then install washers and nuts and torque to the specified value.
- Mount the locker cabinet to the pedestal with the specified carriage bolts, checking that inside fasteners are seated and torqued correctly, since alignment and torque should be rechecked after the cabinet is placed to catch any settling from the initial set.
- Confirm the concrete has met its full cure time before loading the unit with heavy compartments, and revisit torque values after the first few weeks of use.
- Photograph anchor locations and record fastener specs for the warranty file. Nobody remembers bolt torque six months later without a record.
Adjusting Materials and Anchors for Local Climate
A pad detail that works fine in a mild coastal town will fail differently than one that works in a Rocky Mountain winter. Match hardware and finish to the climate the property actually sits in, not a generic spec sheet.
- Freeze and frost: Extend the foundation to local frost depth, specify air-entrained concrete, and use frost-resistant anchor hardware rated for repeated freeze/thaw cycling. We cover this in more depth in our guide to freeze-resistant locker materials.
- Snow and plow zones: Site the unit outside direct plow lines, since placing lockers near drive lanes or snowplow routes raises impact risk, and add bollards where clearance is tight. Our snow-resistant design guide walks through siting details specific to plow routes.
- Coastal salt exposure: Specify stainless steel or hot-dip galvanized anchors and protective coatings, and grade drainage away from the unit to limit standing saltwater contact.
- Extreme heat and UV: Choose UV-stable finishes, confirm control electronics have adequate ventilation, and verify refrigerated compartments have clearance for their condenser airflow.
Every one of these adjustments costs less at the design table than as a mid-warranty repair.
What Should Be Checked at Commissioning and Ongoing Maintenance?
Commissioning is the last chance to catch an installation error before the property manager takes over daily operation. A short, disciplined checklist here prevents most of the service calls that follow in year one.
- At commissioning: Test network connectivity, lock actuation, resident notification alerts, and camera and lighting function before handoff.
- Visual inspection: Confirm anchor bolt engagement, check grout and seal integrity around the pedestal base, and run a hose test to watch water flow after a simulated rain event.
- Ongoing schedule: Weekly visual checks, monthly connectivity and access-log reviews, and an annual anchor and concrete inspection catch most issues before they become failures.
- Documentation to keep: Concrete batch ticket, anchor spec sheet, installation photos, and the vendor’s commissioning sign-off, since these matter for warranty claims.
- Service tier impact: A vendor maintenance agreement shifts most of this burden off the property team, while a self-managed install means the property staff owns the inspection calendar.
Our Perspective: What Field Experience Actually Teaches
Most change orders on outdoor locker projects trace back to three things: a rough-in that was missed before the pour, a pad poured to the wrong depth for local frost conditions, or anchors that don’t match the pedestal template. All three are avoidable if the vendor’s rough-in drawings get treated like a real construction submittal, reviewed in preconstruction rather than referenced after the slab is already down. Climate-adapted finishes and a service agreement do more for long-term cost than most property teams expect going in.
How We Support Your Locker Foundation and Installation
Getting a concrete pad, anchor pattern, and power rough-in right on paper is one thing. Getting it built correctly on a live construction site, across dozens of properties in different climates, is another. Nationwide sales and installation services are available for outdoor parcel lockers and weatherproof kiosks, including options tailored to various climate conditions.
Beyond the initial install, ongoing service and maintenance plans keep anchor torque, seals, and connectivity in spec long after the concrete has cured. If you’re planning a new property or retrofitting an existing site, the most useful next step is a site survey and itemized installation quote so your pad specs and rough-ins are locked in before your contractor breaks ground.
Sources
Pull these into your construction submittal package rather than relying on secondhand summaries. Manufacturer installation manuals and rough-in drawings give exact anchor patterns and pad thickness tables, and vendors publish these specifically so contractors and engineers can cite them directly in shop drawings. Division 10 and 4C mailbox references help when a locker install shares space with a traditional mailroom buildout, and our own guides on outdoor installation considerations and year-round performance cover site-specific adaptations in more depth. For anchor selection basics that apply broadly across outdoor equipment, commercial anchoring guidance is a useful cross-check against your vendor's own template.
- Salsbury Industries 3302 Outdoor Parcel Locker User Manual
- INSTALLATION MANUAL (valiant™ outdoor parcel locker - 1590 Series)
- Smart Package Lockers for Apartments: Buyer’s Guide
Recommended
Ready for a Luxer One® package locker quote?
Tell us your unit count and we'll send right-sized pricing with a fast response time.
Get my free quote