May 12, 2026
Apartment locker setup guide: maximize efficiency now
Unlock efficiency with our step by step apartment locker setup guide. Reduce chaos and enhance service for residents and staff today!
Package chaos is costing your property money, staff time, and resident trust. Packages piling up in lobbies, delivered to wrong doors, or going missing are daily headaches that drive lease non-renewals and spike complaint calls. A well-planned, secure package locker system eliminates all of that. This guide walks you through every stage of apartment locker setup, from initial site planning to long-term optimization, so you can deploy a solution that genuinely works for your residents and your team.
Table of Contents
- Initial planning and requirements overview
- Capacity and configuration planning
- Vendor selection and feature evaluation
- Installation, software setup, and launch
- Troubleshooting and optimizing for long-term success
- What most property managers miss about apartment locker setup
- Explore locker solutions for your property
- Frequently asked questions
Key Takeaways
| Point | Details |
|---|---|
| Site prep is crucial | A thorough site assessment prevents costly installation errors and assures compliance. |
| Right sizing prevents overflow | Matching locker capacity to unit count and delivery volume supports smooth operations. |
| Smart vendors matter | Selecting vendors with robust integrations and support ensures lasting reliability. |
| Monitoring improves efficiency | Post-launch analytics and daily audits help refine locker usage and address issues. |
| Hybrid solutions handle peaks | Combining lockers and package rooms lets properties manage oversized and peak deliveries seamlessly. |
Initial planning and requirements overview
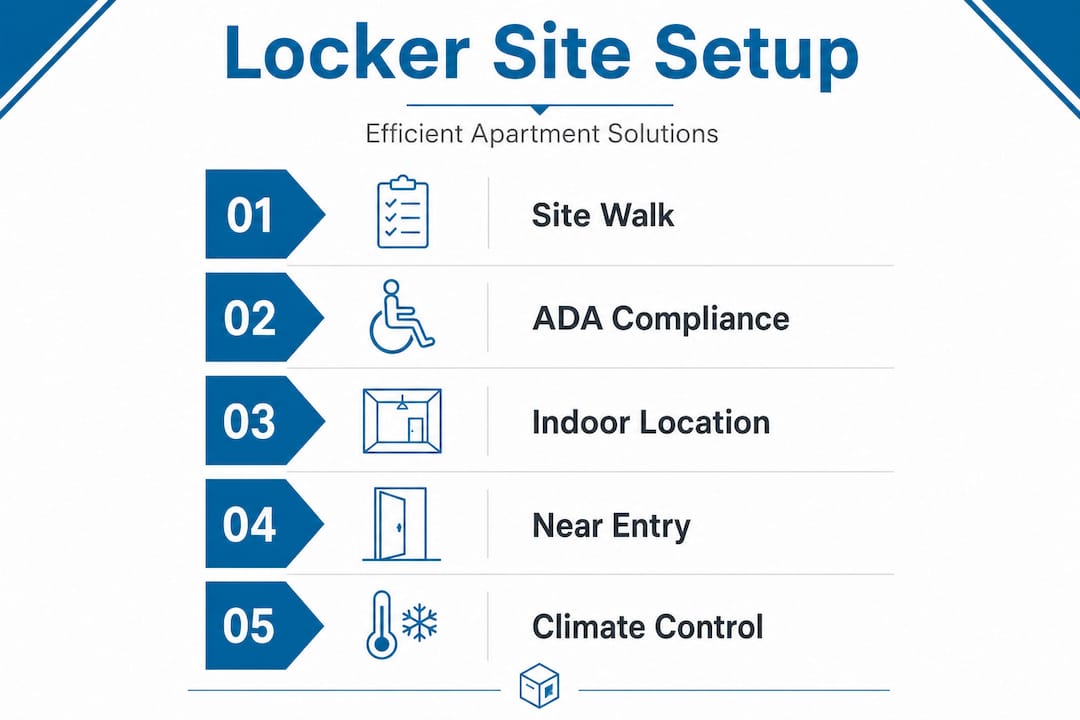
After understanding why lockers are essential, the next step is laying the groundwork for a successful installation. Rushing past this phase is the most common reason locker installations underperform. A thorough site assessment protects your investment and prevents expensive do-overs.
A site assessment should evaluate space, traffic flow, delivery volume, electrical and network needs, and ADA compliance before a single piece of equipment is ordered. That means walking your property with a tape measure and a realistic picture of daily delivery patterns, not just a gut estimate.
Here are the core site requirements to check off before you move forward:
- Available floor space: Measure the area in square feet and confirm it can accommodate locker towers plus clearance for residents and carriers.
- Electrical access: Most smart locker systems require a dedicated 20-amp circuit. Know where your nearest panel is located.
- Network connectivity: Reliable Wi-Fi or ethernet is essential for automated alerts and remote management features.
- Lighting: A well-lit installation area improves security camera effectiveness and resident confidence.
- Traffic flow: Plan locker placement so it does not create a bottleneck at building entry points during peak delivery hours.
- ADA compliance: Doorway widths, turning radius for wheelchairs, and accessible compartment heights are all regulated. Non-compliance is a legal risk, not just a convenience issue.
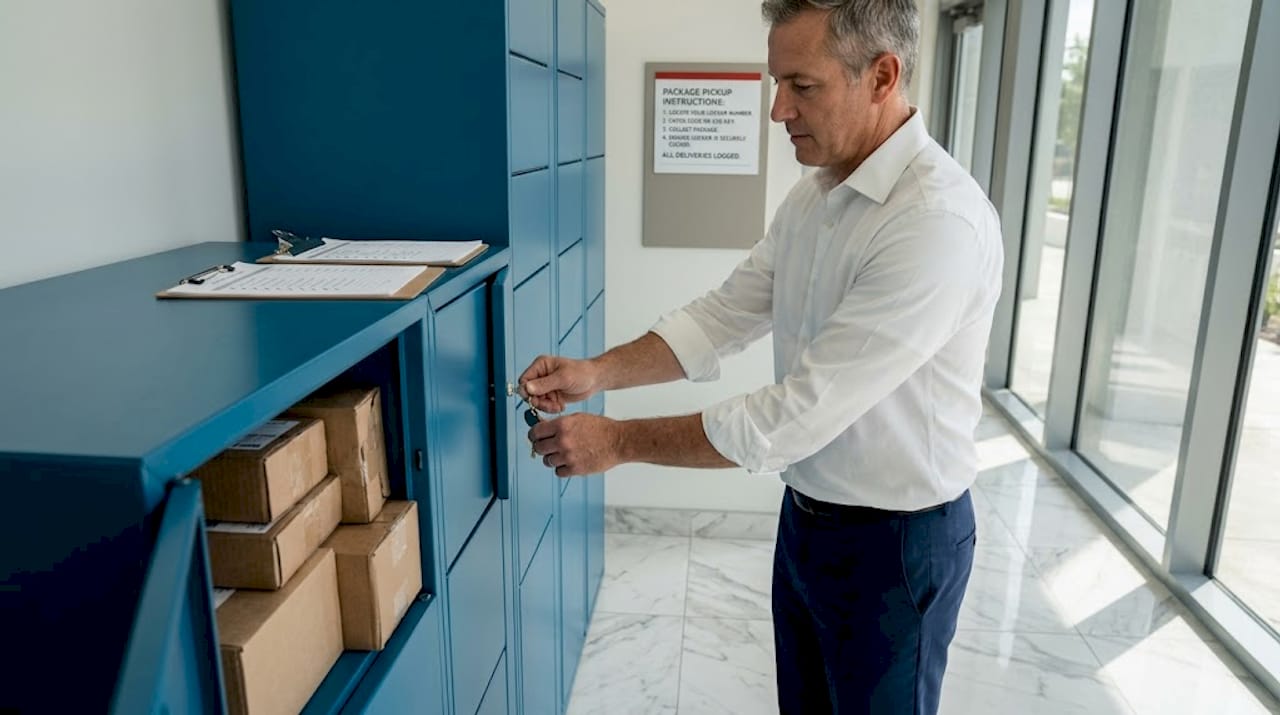
Prioritizing indoor and ADA-compliant locations near the mailroom or main entry is the most efficient approach for resident access and carrier convenience. Properties that place lockers in secondary hallways or basement areas often see lower adoption rates because residents find the pickup experience inconvenient.
For indoor installation options, the ideal zone is a climate-controlled space visible from the lobby or leasing office. This dual visibility improves security and reduces staff interruptions. If your property has a high volume of grocery or meal kit deliveries, contactless delivery solutions with refrigerated compartments belong in your planning conversation early.
Pro Tip: Bring in a professional installer for the site walk. The upfront cost pays for itself quickly by reducing project risk and preventing costly retrofits mid-installation.
| Site factor | What to check | Why it matters |
|---|---|---|
| Floor space | Minimum 6 ft wide per tower | Accommodates locker footprint and clearance |
| Electrical | 20-amp dedicated circuit | Powers electronics and connectivity |
| Network | Wi-Fi or ethernet availability | Enables automated alerts and remote access |
| ADA compliance | Compartment height, door clearance | Legal requirement and resident accessibility |
| Lighting | At least 50 lux at locker face | Improves camera quality and resident safety |
Capacity and configuration planning
Once the site is assessed and requirements are clear, it’s time to choose the right locker setup for your property volume and layout. Getting capacity wrong is expensive. Too few lockers and you have overflow every Monday morning. Too many and you’ve tied up capital unnecessarily.

The widely used industry benchmark is 40 to 50% locker doors per unit, with one tower for every 30 units and a size mix of approximately 47% small, 29% medium, 11% large, and 13% oversized compartments. A 100-unit property, for example, should target 40 to 50 locker doors distributed across roughly three to four towers.
Why does size mix matter so much? Because carriers are delivering increasingly large items. Residents order furniture components, appliances, and bulk goods regularly now. If your compartment mix skews too heavily toward small doors, you’ll hit overflow on large packages constantly, which defeats the purpose of having lockers at all.
Key capacity planning checkpoints include:
- Unit count baseline: Use your current occupancy numbers, not the total unit count, to model realistic daily volume.
- Packages per unit per week: Industry averages hover around 2 to 3 packages per unit per week, but high-income or urban properties can exceed 5.
- Peak planning: Holiday shipping seasons, move-in weeks, and back-to-school periods can triple your average daily volume. Your locker count should handle peak, not just average, days.
- Overflow strategy: Even the best-planned systems need a fallback. Define your overflow protocol before you go live, whether that’s a dedicated package room or a staffed window.
| Property size | Recommended locker doors | Tower count | Notes |
|---|---|---|---|
| 50 units | 20-25 doors | 1-2 towers | Include at least 2 oversized bays |
| 100 units | 40-50 doors | 3-4 towers | Hybrid room recommended for peaks |
| 200 units | 80-100 doors | 6-7 towers | Consider refrigerated add-on |
| 300+ units | 120-150 doors | 10+ towers | Full hybrid package room setup likely required |
Efficient package room solutions become critical for larger properties because locker towers alone can’t handle the volume at scale. A hybrid model, combining lockers with an automated package room, gives you the capacity for peaks while keeping the self-service convenience residents expect.
Post-launch analytics allow you to monitor compartment use by size category and refine your mix over time. If your small compartments are full by noon every day but your large bays sit empty, that’s actionable data. More detail on using analytics for optimization is covered in our locker capacity planning resources.
Vendor selection and feature evaluation
With a clear picture of capacity and configuration, your next task is choosing a vendor that delivers the functionality and support your property needs. This decision shapes your long-term operational experience far more than people expect.
Here’s what to evaluate systematically:
- Smart features: Does the system send automated pickup alerts via text and email? Can residents or staff manage deliveries remotely through a mobile app?
- Property management integrations: Vendor selection that prioritizes integrations with platforms like Yardi and RealPage reduces administrative overhead significantly. If your locker system doesn’t sync with your existing software, you’re creating a data island.
- Carrier compatibility: Confirm your shortlisted vendor works with all major carriers, including USPS, UPS, FedEx, and Amazon Logistics. A carrier incompatibility at your property is a real operational problem.
- Durability and weather resistance: Outdoor installations need units rated for your local climate. Powder-coated steel, sealed electronics, and weather gaskets are not optional for outdoor setups.
- Vendor support model: What does installation support look like? Is there 24/7 tech support? How fast are service response times for hardware failures?
- Pricing structure: Understand whether you’re buying outright, leasing, or subscribing. Each model has different cash flow implications and upgrade pathways.
“Established providers in this space differ in their core strengths: some focus on reliability and support, others on scale and carrier compatibility, and others on IoT integration. Match the vendor’s strength to your property’s priorities.”
Pro Tip: Request references from properties similar in size to yours. A vendor that excels at large urban communities may not be the right fit for a 60-unit suburban garden-style property. Call those references and ask specifically about post-installation support experiences.
Browse available locker options to compare configurations, and work through a vendor evaluation checklist with your management team before signing anything.
Installation, software setup, and launch
The right vendor is in place. Now let’s break down installation and launch to ensure everything works from day one.
Professional installation for a standard apartment locker setup typically takes 1 to 3 days, including hardware placement, software setup, testing, staff training, and resident communication prep. Here’s the sequence to follow:
- Pre-installation prep: Confirm electrical and network readiness. Have your IT or maintenance team verify circuit availability and internet connection strength at the locker site before the installation crew arrives.
- Hardware placement: Installers secure locker towers to the floor or wall as specified. Confirm ADA-accessible compartments are at the correct height during this phase, not after.
- Software configuration: Your system administrator sets up the property portal, enters unit and resident data, and configures automated notification preferences.
- Integration testing: Test Yardi, RealPage, or whatever property management system you use. Confirm that delivery alerts trigger correctly through a test delivery.
- Carrier coordination: Notify carriers of the new system, provide access codes, and confirm they understand the drop-off process. Carrier error is one of the most common sources of early locker complaints.
- Staff training: Every leasing and maintenance team member should be able to walk a resident through a pickup, reset an access code, and flag a hardware issue.
- Resident communication: Send a detailed email announcement, post signage at the locker location, and consider a brief instructional video or QR code linking to a how-to guide.
“Underestimating peaks and volume is one of the most consistent failure points in locker deployments. Daily audits and professional management complement technology for optimal operations, especially during the first 90 days.”
For properties with exterior access needs, outdoor locker solutions and refrigerated locker installation options extend your package management capability beyond the lobby. Both require additional site preparation for weatherproofing and power supply, so plan those details in the vendor selection phase.
Post-launch, assign one team member to monitor the system dashboard daily for the first two weeks. Look for full compartments, unclaimed packages over 48 hours, and any access errors.
Troubleshooting and optimizing for long-term success
Even after a smooth launch, ongoing troubleshooting and optimization are crucial for lasting efficiency and resident satisfaction. The first 90 days are your highest-risk window for issues, and most problems are avoidable with consistent attention.
Common issues and fixes:
- Lockers filling up before the day ends: This is almost always a capacity miscalculation or a resident pickup delay issue. First, run analytics to determine whether small, medium, or large compartments are the bottleneck. Then set up automated reminders that escalate in urgency if a package sits for more than 24 hours.
- Carrier delivery errors: Carriers occasionally leave packages outside or in the lobby even when lockers are available. Place clear instructional signage at every building entry point and confirm your carrier contacts have the correct access credentials.
- Resident access failures: Reset codes quickly and document each incident. Patterns in access failures often point to a software configuration error rather than individual user error.
- Network outages: Smart lockers need connectivity to function. Build a backup protocol, such as a staffed overflow process, for the rare event of an extended outage.
Pro Tip: Schedule a formal monthly audit for the first six months post-launch. Review pickup rate, average dwell time per compartment, and overflow frequency. These three numbers tell you almost everything about whether your system is sized and configured correctly.
The data from post-launch analytics gives you real evidence to refine your compartment mix. Properties that monitor these metrics consistently outperform those that treat the locker system as a set-and-forget solution.
The hybrid threshold matters. Properties receiving over 20 oversized packages per week need a hybrid approach combining lockers with a dedicated package room. Trying to force-fit oversized deliveries into a locker-only system creates overflow, resident frustration, and staff workarounds that undermine the whole purpose of automating package management. Our team at Locker Solutions can help you identify that threshold for your specific property before it becomes a problem.
Statistic spotlight: Properties that implement daily audits and professional management protocols during the post-launch phase see measurably higher resident satisfaction and lower package-related complaint rates than those relying solely on automated systems without human oversight.
What most property managers miss about apartment locker setup
Having covered troubleshooting, here’s a candid perspective on what actually separates successful locker setups from the ones that create ongoing headaches.
Most property managers approach locker installation as a technology purchase. Pick a vendor, order the equipment, get it installed, and move on. That mindset leads to underconfigured systems, frustrated residents, and staff who spend more time managing locker problems than they saved on package handling.
The real separator is volume estimation. Nearly every locker failure we see traces back to underestimating delivery frequency, especially during peak periods. A property that averages 80 packages a day during normal weeks might see 250 packages a day during the December holiday peak. A system sized for the average will fail catastrophically at peak, which is exactly when your residents are paying the closest attention.
Underestimating peaks and volume is one of the most consistent failure points in locker deployments, and daily audits with professional management are what close that gap. Technology is a tool, not a complete solution.
The second thing managers miss is the hybrid decision. If your property crosses the threshold of 20 or more oversized packages per week, you need a hybrid approach that pairs lockers with a managed package room. Trying to handle everything with lockers alone means your large bays are perpetually full, your small bays go unused, and residents get pickup notifications for packages that can’t actually fit in the system.
Analytics are the third underutilized asset. The dashboard your locker vendor provides is not a compliance checkbox. It’s an operational feedback loop. Properties that review compartment usage data monthly, track average dwell times, and act on what they see continuously improve their setup. Those that ignore the data plateau quickly and eventually have the same complaints year after year.
The most successful properties treat locker management as an ongoing operational discipline, not a one-time infrastructure project.
Explore locker solutions for your property
This guide has covered everything from site assessment to post-launch optimization. Now it’s time to put that knowledge into action with the right equipment and support behind you.
Locker Solutions specializes in Luxer One® secure lockers and package rooms designed specifically for multifamily residential properties. Whether you need indoor package lockers for a climate-controlled lobby, outdoor kiosks built to handle any weather condition, or a fully integrated locker solution combining lockers with automated package rooms, we have configurations to fit properties of every size. Our team handles site assessment, rapid deployment, software setup, and ongoing maintenance support so your staff doesn’t carry that burden. Reach out today for a consultation and let’s build a package management setup your residents will actually use.
Frequently asked questions
How many package lockers do I need per apartment unit?
Industry benchmarks recommend 40 to 50% locker doors per unit, with roughly one tower for every 30 units to keep pace with daily delivery volume.
How long does apartment locker installation usually take?
Professional installation for most apartment properties takes 1 to 3 days, covering hardware placement, software configuration, and testing.
What is the best location for package lockers in an apartment building?
Indoor locations near the mailroom or building entry, with full ADA compliance, deliver the best combination of resident accessibility and carrier convenience.
How can I handle oversized packages or peak delivery times?
Properties receiving more than 20 oversized packages per week should implement a hybrid locker and package room setup, combined with daily audits, to avoid overflow during peak periods.
Ready for a Luxer One® package locker quote?
Tell us your unit count and we'll send right-sized pricing with a fast response time.
Get my free quote